Food is Love, Love is Food.

A blog devoted to the connection between meals, memories and the special moments in our lives.

Friday, July 30, 2010

Eating Flowers with Cookie

One of my favorite hobbies is dining at a wonderful restaurant and then trying to recreate a special dish at home.  One of the people with whom I love to dine is my dear friend, Courtney.  Courtney and I go way back.  We were randomly assigned as roommates our freshman year of college, and our friendship has spanned many of the most important events of our lives.  We have talked each other through breakups, deaths in our families, new jobs, and of course, changing hairstyles.  I think only our mothers were happier than we on the day we moved into our dorm room.  Somehow with that motherly instinct, they sniffed each other out, and knew we were a match.  Each returned to her home confident that her daughter had found someone with a similar background, interests, and values.  We both grew up in homes where we interacted with our grandparents on a daily basis (mine lived upstairs, hers, right next door, we are both half Irish and half Italian, and we both had large, close extended families.  We were 'simpatico' from day one. In addition to living together that first year, we also studied abroad together during our junior year.  Courtney's name was a difficult one to pronounce for many of the students at the Swiss college we attended, so her nickname that year became "Cookie."  It stuck, and I and many of her other friends still use it.

Twenty five years later, we get together at least once a year, as Courtney lives in the Midwest, and I live on the East coast, to reconnect.  We talk about our families, careers, travels and books we have read, and pretty much anything else that comes up.  Given our Italian background, our tradition in to have a great Italian dinner together.  Last week, I spent three days in New York City with Cookie, and we had several wonderful meals.  One of these meals was most memorable.  I don't know if it was the atmosphere, or the bottle of Proseco with which we started the meal, but I think this was our best Italian meal yet. 

One of the appetizers we had was zucchini blossoms stuffed with fresh ricotta cheese, and then fried, and they were amazing.  As I am a bit overwhelmed with zucchini right now, I decided to try to recreate the dish at home.  It served both as an excellent way to begin our meal the other night, but it also accomplished the secondary goal of cutting down the number of zucchini produced by the plants.  Brilliant!

For the stuffing:
1/3 cup of chevre goat cheese
1/3 cup of good quality ricotta
1/2 tsp. salt
1/2 tsp. pepper
5 or 6 fresh basil leaves, julienned
1 garlic clove, minced almost to a paste
1 tsp. fresh lemon juice

Mix all ingredients well in a bowl.

6-8 zucchini blossoms, trimmed and washed
1 egg, well beaten and placed in a shallow bowl
1 cup vegetable oil, for frying

3/4 cup of plain breadcrumbs
2 tbsp. grated Pecorino Romano cheese
1/2 tsp. paprika
1/2 tsp. chopped parsley

Mix last 4 ingredients together in a shallow bowl


To assemble:

Gently open the zucchini flowers, one at a time, by pulling open one of the petals.  Take about 1 1/2-2 tablespoons of the cheese and place inside the blossom, folding the blossom closed.  Once all the blossoms are stuffed, dredge each blossom in the egg, then in the breadcrumb mixture.  Heat the oil in a small frying pan until very hot, and place 2-3 blossoms at a time in the oil, turning once when they are golden brown.  This should only take 45 - 60 seconds per side, so the whole blossom will be done in less than 2 minutes.  Drain on a plate lined with 2 layers of paper towels, and let cool for a few minutes.


Thursday, July 29, 2010

Necessity is the Mother of Invention: Blueberry Lemon Galette

Last week, I was fortunate enough to have an opportunity to spend three days in New York City with my dear friend Courtney.  That visit deserves and will get its very own post, as Courtney and I have wonderful food traditions of our own, and had some amazing meals on this particular visit.  While I was gone, my husband did an admirable job of not only feeding, clothing and entertaining our daughters, but he also managed to instill in them the desire to tidy up the house, which is no small feat for him, as he has no such inclination of his own.  I am so fortunate to have a husband who not only understands but encourages me to go off to visit a friend a few days out of every year.  I think in these times, when women are so busy taking care of their families and working hard at their careers, it is important to take time just for yourself.  It is not selfish, it is necessary in order to carry out all our responsibilities well. It is wonderful to have the chance to sleep, relax, visit, explore, all on your own, and I always go back to my family with a renewed energy, appreciation and feeling more myself. Michael had a little help from my mom, who hung out with the kids for a few hours each day while he was at work.  In addition to the vast amount of shopping the girls and Grammie accomplished, they also went blueberry picking.  I came home to a beautiful mountain of blueberries, and as hard as we tried, we couldn't put a dent in them.  I knew I would have to do some baking.

When I posted last, I suggested making extra galette dough in order to make two galettes.  I took my own advice, but rather than making two savory galettes, I made one zucchini and goat cheese, and one with the blueberries.  I happened to have a jar of lemon curd in my pantry, so I rolled out the dough, spread a thin layer of lemon curd, and added the blueberries in a single layer to avoid the crust getting soggy with the juice of the blueberries.  I tossed the blueberries with a little instant tapioca, confectioner's sugar, and some lemon juice.  It was delicious, soft, creamy and tart, and the perfect way to thank my husband, my girls and my mom for all they do for me.  


For the filling:
2 cups fresh blueberries
1 tbsp. instant tapioca
1 tbsp. confectioner's sugar
1 tbsp. fresh lemon juice
1/2 cup lemon curd

Toss the first four ingredients together.

For the pastry: (Adapted from Smitten Kitchen)
1 ¼ all purpose flour, chilled in the freezer for 30 minutes
¼ tsp. salt
1 stick unsalted butter, cut into pieces and chilled again
¼ cup sour cream
2 tsp. fresh lemon juice
Zest of ½ lemon
¼ cup ice water

Put flour and salt in a large bowl. Put pieces of butter in the flour mixture, and using a pastry cutter, cut it in until the mixture resembles coarse cornmeal. In a small bowl, mix together sour cream, lemon juice and water, and add to the butter flour mixture, mixing just until barely incorporated. Do not over mix dough. Pat the dough into a ball, cover with plastic wrap and refrigerate for 1 hour.

To assemble:
Roll dough out on a floured surface until it is about twelve inches in diameter.  Transfer to a cookie sheet lined with parchment paper or a silicone baking sheet.  Spread lemon curd in a thin layer over crust, leaving a 1 1/2 inch border all around.  Spread blueberry mixture evenly on top of lemon curd, and fold the border of remaining pastry dough over, pleating to make it fit.  Bake at 400 degrees for about 30 to 40 minutes, or until dough is golden.  Remove, let cool on a wire rack for 10 minutes, slice and serve.  The galette can be served warm or at room temperature.


Saturday, July 24, 2010

Zucchini and Goat Cheese Galette

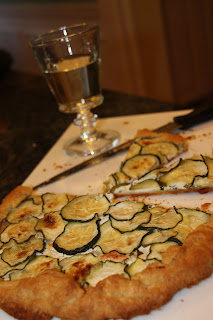
It has been an eventful few weeks around here, and although I have not blogged too much, I have been very busy in the kitchen. My sister and her children have been visiting for the past three weeks from Nome, Alaska, so there have been a lot of mouths to feed. Betsy is a great cook herself, so it was fun to work in the kitchen together a bit as well. One thing I made in particular while she was visiting, I declared to be the best thing I ever cooked. The recipe looked so good, that I was even willing to turn the oven on in the oppressive heat we have been having in the Northeast. It seems like whenever Betsy, John, and Sarah are visiting, there is a massive heat wave. Just our little way of reminding Betsy of what summers are like here in the lower 48! My sister and the kids left on Wednesday, and she is anxious to have this recipe. I am anxious to make it again, especially since I still have a whole lot of zucchini and summer squash from the garden, and need to use them up. I adapted this recipe from a recent post of one of my favorite blogs, Smitten Kitchen. I added some lemon, and used goat cheese instead of ricotta, and it truly was one of the most delicious things ever. You can serve it warm or room temperature, and you might want to make a few, if you are turning on the oven anyway, because the one I made went fast!
Zucchini and Goat Cheese Galette: (adapted from Smitten Kitchen)
For the crust:
1 ¼ all purpose flour, chilled in the freezer for 30 minutes
¼ tsp. salt
1 stick unsalted butter, cut into pieces and chilled again
¼ cup sour cream
2 tsp. fresh lemon juice
Zest of ½ lemon
¼ cup ice water

Put flour and salt in a large bowl. Pit pieces of butter in the flour mixture, and using a pastry cutter, cut it in until the mixture resembles coarse cornmeal. In a small bowl, mix together sour cream, lemon juice and water, and add to the butter flour mixture, mixing just until barely incorporated. Do not over mix dough. Pat the dough into a ball, cover with plastic wrap and refrigerate for 1 hour.
For the filling:
1 large or 2 small zucchini or summer squash (or both!), sliced into ¼ inch thick rounds
2 tsp. olive oil
1 large garlic clove, smashed and minced
½ cup goat cheese
½ cup low fat cream cheese
¼ cup shredded mozzarella (I used fresh mozzarella)
Big bunch of basil leaves, julienned
1 tbsp. fresh lemon juice
Zest of ½ lemon

Spread the zucchini slices over a few layers of paper towels, salt the side facing up, turn over and salt the other side. Let sit for about 20-30 minutes to allow some of the water to seep out. In a bowl, mix the three cheeses, garlic, basil and 1 tsp. olive oil.

Roll the galette dough out onto a floured work surface until it is about 12 inches around. Line a baking sheet with either parchment paper or a silicon baking mat, and transfer the crust to the sheet. Spread the cheese mixture on the crust, leaving about a two inch border on all sides. Arrange the zucchini slices beautifully around the crust, and then fold the edges of the crust over slightly, pleating as you go. Drizzle the zucchini with the remaining teaspoon of olive oil.  You can brush the edges of the crust with an egg wash if you would like, though I forgot to do so.
Bake at 400 degrees for 30-40 minutes, until the crust is golden brown. Cool on a wire cooling rack for several minutes, slice and enjoy.

Saturday, July 17, 2010

Appetizers for Friends


Although I have always loved to go out to dinner at a restaurant, I also love to go to a friend’s house for dinner. In many ways, it is more relaxing, and in these difficult economic times, it is a much less expensive way to get together with friends. There are always plenty of laughs, great conversation, and of course, there is usually a new dish or two, something you have never had before. People tend to surround themselves with friends who have similar interests, and many of our friends are excellent cooks and entertainers who enjoy really good food. My friend Denise is one of these excellent entertainers. She and her husband Marc are great cooks, but their true strength is in the appetizers. Denise always puts out a great antipasto platter, cheeses with fruit and crackers, some warm bites, and a dip or two. It is my favorite way to eat, because you get to try a little of a lot of different foods.  One of my favorite things to make for an appetizer these days is something I first had at Denise’s house. It is a hummus dip that is just assembled from prepared items and chopped vegetables, so it is super easy to put together. It is also relatively healthy, so there is not a lot of guilt to deal with. It is easily prepared ahead of time, and can be popped in the fridge until your guests arrive.


Hummus Dip:

8 oz. low-fat cream cheese, softened
2 tsp. fresh lemon juice
1 10- oz. package hummus (I like Sabra brand – it is very creamy)
¼ small red onion, chopped
1 small tomato, or about 15 grape tomatoes, cut into bite sized pieces
1 cucumber, peeled, seeded, and cut into chunks
3-4 oz. good feta cheese, crumbled
1 package multi-grain pita chips

In the bottom of a small pie plate or similar dish, mix lemon juice with the softened cream cheese, and spread evenly in bottom of the dish. Next, layer the hummus on top of the cream cheese, spreading evenly as well. Toss the chopped onion, tomato, and cucumber in a bowl, and spread evenly over the hummus. Top with crumbled feta cheese, and serve with the pita chips for dipping.  You can add different veggies, or olives if you like.

Wednesday, July 14, 2010

Eureka Moments: Birthday Buttercream

I had a double eureka moment this weekend. A while ago, I posted a blog entry about a new recipe for buttercream frosting that I just love. This is birthday season in my house. Over the past 7 weeks, every member of my immediate family has had his or her birthday, so there has been a lot of buttercream flying around. Last Friday, I made cupcakes for my daughter Emily and the group of girls she had over to celebrate her thirteenth birthday. I cut the recipe for the buttercream in half, and frosted 20 cupcakes, with a little frosting left over. In my original posting, I had stated that the frosting needed to be used the day it was made, and that once it was refrigerated, the frosting would not work for spreading or piping. I Stand Corrected! I experimented with my leftover buttercream. Refrigerating it overnight, I took it out of the fridge the next morning, and let it sit out on the countertop at room temperature for several hours, and it became easily spreadable again! So, though it takes some time, it is possible to make the frosting a day or two ahead.


So that was Emily’s birthday with friends. Sunday was her actual birthday, and though my dear cousin Laurie used to say that the birthday of a child should celebrate the mom, there I was making my girl another birthday cake (and I wouldn’t have it any other way). Her request was a ‘monkey cake,’ and with the help of my husband, who is quite the creative genius, we used geometry to cut up cake circles to form a monkey head. As I began to make the buttercream frosting, Emily reminded me that she wanted chocolate frosting. I had a moment of panic, then decided to try to improvise. I had started the process of adding the confectioners sugar to the creamed butter, so I threw in about a half cup of cocoa powder, and kept my fingers crossed. Turned out, it worked just fine! The frosting was a beautiful light brown (perfect for said monkey), and had a light chocolate flavor, still creamy and not too sweet. I added a little toasted coconut to the top of the cake, and it was utterly delicious; rave reviews from all the party goers! So here is the original buttercream recipe again, along with the chocolate variation. You can add more cocoa powder for a more intense chocolate flavor.


American Buttercream
1½ pounds unsalted butter
7½ cups Confectioners Sugar
5¼ cups heavy cream
Vanilla bean or vanilla extract

With paddle attachment, cream the butter until smooth, scraping down the bowl several times. Add sugar slowly, incorporating into butter to form a smooth paste. Warm the heavy cream to 98-100 degrees, and begin to drizzle in, with mixer running, very slowly. Continue to add until all the cream is incorporated, and frosting is smooth and full of body.


Notes:
1. For the chocolate variation, once you have added the confectioners sugar, add a half cup of cocoa powder or more, depending on the intensity of flavor that you desire.

2. There is no need to sift the confectioners sugar, even if you are going to use a fine piping tip, as I did for this cake. The warm cream dissolved it all, and there were no problems.

3. The recipe says to drizzle the warm cream in very slowly. Really. I am not kidding. I had to throw out 2 batches due to excessive eagerness which led me to drizzle too quickly. Then it is a big batch of liquid goo. There is real science going on here, people.

4. I did place the frosting in the fridge for about 7 – 10 minutes before putting it into the piping bag just to firm it up a little, but I was working with it on a hot day, so plan accordingly, but do not leave it in the fridge too long.

5. This recipe make a lot of frosting.  I cut it in half to frost 20 cupcakes, and then did so again to frost 2 round cakes (cut up) to make the monkey cake. 

Friday, July 9, 2010

Blueberry Heaven

It is blueberry season here in New England. I am lucky enough to live in a town with beautiful fruit orchards, and I take advantage of that at every season: strawberry season, blueberry and raspberry season, peach season and apple season. Over the fourth of July weekend, I went blueberry picking with my husband and daughters and my sister and her kids, who are all visiting from out of town. We parked our cars, climbed up onto the wagons, which brought us to the tall blueberry bushes in the back of the orchard, and started picking. It was just too easy; the dark, juicy berries were literally dripping from the branches, and in about 15 minutes, our small buckets were nearly full. Well, most of the buckets were full. All the kids, with the exception of my nephew John, whose motto is: “I pick, I don’t eat,” seemed to make it their singular goal to eat at least as many blueberries as they deposited in the bucket. My daughter Emily was the clear winner. When we were done, she had three berries in her bucket. Truth be told, though, my husband did start a small blueberry war with the kids, so a few were lost in the battle. All in all, it was a beautiful day; sun, berries, family togetherness. All the best things in life. By the time we got home, I realized that we had far more blueberries than we could eat, so I was forced to bake! Perfect timing for the party we had on Sunday. My sister made a delicious blueberry pie and I made my favorite blueberry dessert ever: Crumbly Blueberry Cake. It is just about heaven and captures the happiness I felt on that particular day.

Crumbly Blueberry Cake:
For cake batter:
4 cups all-purpose flour
4 tsp. baking powder
1 tsp. salt
1 stick unsalted butter
1 ½ cup sugar
2 large eggs
1 cup milk
2 pints fresh blueberries
Zest of 1 lemon
Juice of ½ lemon
1 tsp. lemon extract

For the topping:
1 cup sugar
½ cup all purpose flour
1 tsp. cinnamon
1 stick butter, chilled and cut into small chunks

To make batter:
Preheat oven to 375 degrees. With an electric mixer, cream butter and sugar until light and fluffy. Beat in the eggs, then the milk. Add the lemon juice, extract and zest. Add the dry ingredients in batches beating just until combined. Fold in blueberries. Put batter in a greased 9x13 inch pan, and pour batter in, spreading until it is evenly distributed.

To make topping:
In a bowl, combine all topping ingredients and using a pastry cutter, cut in the butter until the mixture resembles coarse cornmeal.

Sprinkle topping evenly over batter, place in the oven and bake for 45-55 minutes, or until tester comes out clean.

Monday, July 5, 2010

Instant Gratification: Quick Basil Pesto

When we were children, my mother would spend an entire late summer afternoon creating her version of basil pesto. This garlicky, nutty, salty paste just reeked of summer, and by making such large batches, my mother ensured that we would have it throughout the year.

 Later in the summer, I will take my large food processor, and make several great batches of pesto, enough to keep my family going over the winter. With my garden going strong, so many basil plants turning into small shrubs already, I feel that I will not have to ration it this winter, as I have in the past. When there is enough basil, pesto flavors not only pasta, but soups, meats, sauces, and vegetables throughout the whole winter, bringing a little of that fresh taste to remind us of the goodness of summer. It makes a winter tomato sauce taste rather sunny. It brings a depth of flavor to chicken soup, and spread on homemade bread, is just heavenly. But the summer has not been long enough for me yet. There is not enough basil to make the large batches. I do not feel the desire or the need to store the summer away in the freezer just yet either. For now, as I crave the intense basil flavor of pesto, I will make just a little handful of it, using different nuts to experiment. Late last week, I made a lovely pesto with some raw cashews, Romano cheese and of course, lots of garlic. I have a small food processor that I leave on my countertop, and it worked beautifully. I served the pesto on some long ribbons of zucchini and summer squash I made by using a vegetable peeler. I blanched the ribbons of squash for less than a minute, then tossed them with a good sized dollop of the fresh pesto, though I could seriously have just eaten the pesto with a spoon. For me, like summer, a quick little pesto sauce is about instant gratification.


A Quick Basil Pesto:

1 cup tightly packed basil leaves
2 cloves of garlic
3 tbsp. extra virgin olive oil
Small handful of nuts (pignoli nuts are traditional, but I have used almonds, cashews, and walnuts with great results)
3-4 tbsp. pecorino romano cheese

In a small food processor, or a hand chopper, process the garlic, then add the basil and oil, and finally, the nuts and cheese. Add a little more oil if necessary in order to blend to a rough paste. Toss with pasta, vegetables, or use as a spread.